

 |
 |
 |
 |
 |
||
|
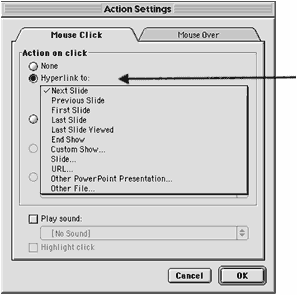
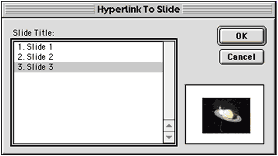
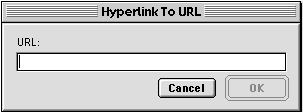
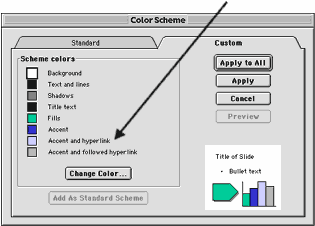
Using PowerPoint Adding Sound Adding Animation Adding Video Adding Hyperlinks ADDING HYPERLINKS A hyperlink is something—usually text—that is activated to take the reader to another place. For example, on the web you know that something is hyperlinked when it is underlined. When the cursor passes over a hyperlink, it turns into a hand, telling the user that clicking here will take them somewhere else. Adding hyperlinks allows you to tell your story in a non-linear way. Using hyperlinks you can web your story into a spiral or start a story that has multiple endings. You may want to sketch out the directionality of your story before you begin to add hyperlinks. You may also wish to hyperlink other objects such as pictures. Decide whether your links will be one-way or whether you can travel back and forth between slides. 1. Open up your PowerPoint story. It’s a good idea to have all your slides created before you make hyperlinks. 2. Open the slide that you want to add a hyperlink to. Insert a text box and type in the text that will be your link to another slide. You can also link to another document on your computer, or even a website—the directions for doing this will follow.  3. Once you have typed the text for your link, make sure that it is highlighted (selected) before you continue. 4. Go to the Slide Show menu. Choose Action Settings...  5. In the Action Settings window, click on Hyperlink to: and choose from a number of options. 6. If you highlight Slide… you can find the slide that you want to hyperlink to. Once you have found the right slide, click OK. You will see a preview of the slide in the bottom right hand corner.  7. You can also choose to hyperlink to a website. If you do this, you need to make sure that you are online when you show your presentation. To link to a website, choose URL… from the choices under Hyperlink to: You will be asked to type in the URL [Internet address] that you want to link to. Type in the URL and click OK.  8. You may want to link to some other file in your computer such as a Microsoft Word file or a Photoshop file. To do this, choose Other file… from the choices. It will ask you which file you would like to link to. Find your file and click Open. 9. When your text has been hyperlinked, it will automatically be underlined. This lets the user know to interact with the text. Hyperlinked text will also change color. To format your own slide color scheme, go to the Format Menu and choose Slide Color Scheme… 10. In the custom section of the Color Scheme window, you can decide on what color the elements of your slide will be. To change the hyperlink color, click on Accent and hyperlink, and then click on Change Color. You can also choose a different color for hyperlinks that have been visited. This lets the user know where they have already been if they come back to the slide again. Watch your show and test your links!  MORE INFORMATION If you are using KidPix or HyperStudio, go to these websites for more information, tutorials, and projects: HYPERSTUDIO Hyperstudio/HS.html KIDPIX Back to top |
||||||||||||||||
©2001 Whitney Museum of American Art |