


|
|
|
|
|
||
|
Using PowerPoint Adding Sound Adding Animation Adding Video Adding Hyperlinks INTRODUCTION PowerPoint is slide show software that is included in the Microsoft Office bundle. Although it was designed for more corporate presentations, PowerPoint can be used creatively to make multimedia slide shows incorporating original artwork, sound, and even video. Here we’ve used PowerPoint software as an example of how to make inventive and interesting visual narratives. You can also use HyperStudio, KidPix, or other kinds of software that can combine images, words, sound, and video. Click on these links to find more information about PLANNING YOUR VISUAL NARRATIVE If you want to plan your story on paper, click here to find two printable The first step in creating a narrative series is to storyboard your story. This provides a map for your narrative. Your storyboard may include sketches and text as well as any additional notes, for example: "include sound effect button here." PREPARING YOUR IMAGES 1. An important decision will be how you want to generate your images. You can:
MAKING YOUR POWERPOINT NARRATIVE 1. When you open PowerPoint, it asks you what type of presentation you want:  2. When you click OK on the first screen, it will ask you what kind of slide you would like. Again you want to choose the blank option. This gives you the most freedom to create your own design.  3. You now have your first blank slide. Next make sure you have your storyboard in front of you and insert your first picture. Go to the Insert menu, choose Picture, and then From File... 4. Next find your images on your computer. Once you have found the one you want to use, click Insert, and the image will appear on your first slide.  5. Once your image is on your slide, save your presentation. You will continue to add new slides to this presentation, so do not open a new one! You can make some changes to your picture if you like. If you click once on your image, you will see little white squares at the corners and sides of the picture. When these squares are present, you know that the picture is selected and you can make changes to it. You can resize the image by dragging the corner squares. Using the corner squares ensure that the image’s proportions stay the same. If you resize the image using the squares on the sides of the image, you will distort it.  6. Use the picture toolbar to make other changes--such as changing the contrast or brightness or cropping your image. If you let your cursor hover over the symbols on the toolbar, a yellow label will tell you what each one does. 7. Once you are happy with the way your image looks, you may want to add text. You can do this by inserting a text box, or by using word art: The shortcut for adding a text box is: 8. Type in your text and then format the font, size, and color. 9. You can also change the background of your slide. Go to the Format menu and choose Background… A background formatting window will appear. By clicking on this drop down menu, you can choose more colors and use fill effects. 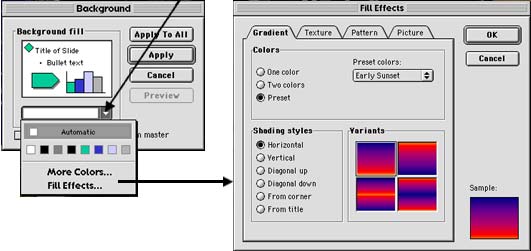 When you have created a background that you like, click OK and apply it to one slide or to all of them. 10. When you have finished with your slide, add another one by going back to the Insert menu and choosing New Slide... Don’t add other media right now — make all your slides first. 11. As you are adding new slides to your story, you can keep track of them by using the slide sorter. When you have your slides in the slide sorter view, you can rearrange them by clicking and dragging them to new positions. Nothing is permanent, so feel free to experiment ordering your story in different ways; you may discover something unexpected.  12. Save often!! Back to top |
||||||||||||||||
©2001 Whitney Museum of American Art |