|
|
|
Introduction Task Process Resources Evaluation Reflection
Jacob Lawrence found inspiration in the Harlem community
where he grew up. His early work shows scenes of Harlem life—people,
rooms, sidewalks, streets, and storefronts—in bold colors and shapes.
The most ordinary tasks, events, and routines sparked Lawrence's imagination.
He used what he saw around him every day to document the people, street
scenes, movement, color, sounds, and spirit of the community. In this painting,
Lawrence used repetition, shadows, and patterns to create the rhythm and
activity of a lively city neighborhood.
Back to the Beginning
In this webquest you will:
- Examine how Jacob Lawrence depicted a neighborhood scene.
- Explore how artists have represented their neighborhoods and communities.
- Collaborate in small groups to research and create a written and visual
sample of your neighborhood.
- Present and discuss your neighborhood views with the class.
Back to the Beginning
|
|
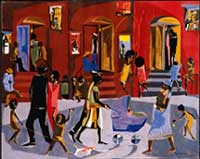 |
Brownstones,
1958
Egg tempera on hardboard
31 1/2 x 37 1/4 in. (80 x 94.9 cm)
Collection of Clark Atlanta University Art Galleries; gift of Chauncey
and Catherine Waddell
© Clark Atlanta University Art Galleries Artwork © Gwendolyn
Knight Lawrence, courtesy of the Jacob and Gwendolyn Lawrence Foundation |
|
| |
|
- Look at Jacob Lawrence's painting,
 Brownstones.
Move your mouse over the painting and find questions to discuss with
your classmates. Brownstones.
Move your mouse over the painting and find questions to discuss with
your classmates.
- With your teacher, go to
 http://www.jacoblawrence.org/art04.html.
Choose painting as the medium. Type "Harlem" in the "title"
box. Click on SUBMIT. Look at other paintings where Jacob Lawrence has
shown Harlem neighborhood scenes. http://www.jacoblawrence.org/art04.html.
Choose painting as the medium. Type "Harlem" in the "title"
box. Click on SUBMIT. Look at other paintings where Jacob Lawrence has
shown Harlem neighborhood scenes.
- Use the web resources below to explore how artists have represented
neighborhoods and communities in public murals.
What have they included in these murals?
- Divide into small groups and do some research about your neighborhood.
How do you define your neighborhood?
Where does it begin and end?
- Draw a street map of the neighborhood around your school with a key
of symbols that represent important neighborhood sites.
- Research stories that have been told about the neighborhood and the
people who live there. Use local newspapers, books, and/or interview
people. Rewrite one or more stories in your own words.
- Which views would you select to create a sampling of your neighborhood:
Buildings? People? Streets? Stores? Styles? Music? What else would be
included?
- Create a sample view of your neighborhood on paper, as a work of art,
or on the computer, using images and words. If you create a computer
presentation, use
 PowerPoint,
HyperStudio, KidPix, Microsoft Word, or other software that lets you
combine words and images. PowerPoint,
HyperStudio, KidPix, Microsoft Word, or other software that lets you
combine words and images.
- With your teacher, explore your neighborhood. Spend time taking notes,
making drawings, and/or taking photos of what you see. Make drawings
or take photos of favorite places in your neighborhood. Look for repeated
shapes and patterns. Use the following questions as a guide.
What is your most ordinary view of your neighborhood?
What is your most surprising view?
What evidence of different cultures do you see in your neighborhood?
What kinds of work do you see people doing in your neighborhood?
How do people use the neighborhoods spaces?
What would you like people to know about your neighborhood?
What would you be able to learn as a visitor or tourist?
Record the sounds of your neighborhood. For example, cars, horns, voices,
sirens, car alarms, animals, footsteps.
- When you have gathered your information, discuss your observations
with your group. Use your drawings, photos, writing, your map, and the
stories that people have told you to make your own multi-media sampling
of your neighborhood. If you recorded sounds, add them to your multi-media
presentation.
- Present and discuss your neighborhood views with the class.
Back to the Beginning
Philadelphia murals.
http://pobox.upenn.edu/~davidtoc/murals/neighborhoods.html
Long Beach.
http://www.ci.long-beach.ca.us/community/murals/index.htm
A selection of murals.
http://muralart.org/gal.htm
California murals.
http://www.muralart.com/california.html
Los Angeles.
http://www.usc.edu/isd/archives/la/pubart/LA_murals/USC/
Scroll down to see a selection of Chicago murals by children.
http://www.yollocalli.org/visual_murals.html
Look for Jacob Lawrence’s New York in Transit mural at the Times
Square subway station.
http://www.mta.nyc.ny.us/mta/aft/tmp896737009.htm
Back to the Beginning
Your group will be evaluated on your visual sample of your neighborhood.
Your teacher may also choose to create rubrics for evaluation.
- What kinds of symbols did you use to represent important neighborhood
sites?
- What kinds of views did you portray?
- How well thought out is the design of your neighborhood?
- Did you use enough resources in order to portray it accurately?
- Does the viewer get a sense of the history, culture and kind of people
found in your neighborhood either from your visual?
 Learning
Standards Addressed Learning
Standards Addressed
Back to the Beginning
Look at your drawings and photos of your neighborhood. Use them to create
3D neighborhood views. Ask your teacher to bend pieces of Foamcore or Styrofoam
in half like this:
Use the vertical part for buildings and the horizontal part for the sidewalk
and street.
Experiment! Use paint, markers, or crayons to make buildings, people, cars,
trucks, and trees on paper or oak tag card. For a 3D effect, add a small
hinge to the bottom of your people and objects.
Cut out the shapes and fold the hinge back so that your people and objects
stand up. You could also use Styrofoam balls, colored wire, Popsicle sticks,
and other found materials. Use glue or glue sticks to arrange your people
and objects in your neighborhood scene.
When you’ve finished, join your neighborhood scenes together to create
one big neighborhood view.
Invite your peers and teachers to see your 3D neighborhood.
Back to the Beginning
|
|